|
|
|
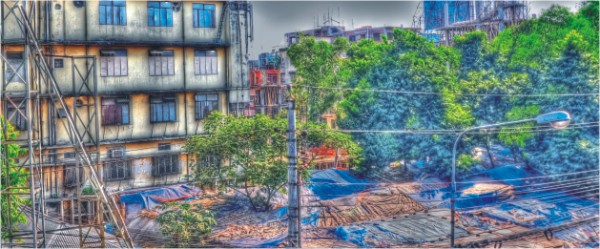
Making Grungy HDR Photographs Things you will need: a Camera that can change exposure levels, a stable Tripod that doesn't rock the moment you touch it, a decent computer that doesn't crash every hour, Photomatic Pro software and a brain in working condition. Advance Note: This is more of a step by step tutorial to making Grungy HDR images and not a review. Photography has definitely picked up as a major passion in Bangladesh and although HDRs have not quite made their way into the scene (possibly due to its surreal bad-pacha attitude), along with traditional photography it is picking up its pace as people start hunting for more creative means to display the awe-smacking awesomeness that they (think for some) are. For those new to the scene, by HDR I do not mean UN's Human Development Reports; in photography HDR stands for High Dynamic Range. Sounds complicated and like awe-smacking-ly awesome stuff? It is awe-smacking-ly awesome but not really that complicated. Read on for a basic guide to the awe-smacking awesomeness. A Quick Explanation of HDR Phase 01: Taking the Photographs 2. Tripod and the Shots: Using a stable tripod is a must because you need to take the exact same scene at least three times in different exposures. I usually begin with -2, 0 ,+2 exposure setting, but depending on the scene you may need more or less; as a general rule, the more contrast your scene has the less number of shots you will need. However, make sure at least one of your photographs has blacks, and one has whites. You can take shots at increments of one or one exposure levels but you need both positive and negative ones. Remember don't shake your tripod while changing exposures! 3. ISO: Keep ISO as low as possible as this will give you more detail and range with minimal noise. 4. DSLR: If you are using a Digital SLR camera, save your shots in RAW as they cover a higher dynamic range than JPEG. Also if you have the bracketing feature, now is the time to make good use of that! (For those who don't know, bracketing lets the camera take 3-5 shots of different exposures of the same scene continuously with the shutter release pressed down without going through the hassle of having to change the exposure manually every time.) 5. Once you are done photo hunting, dump them in your computer and get Photomatic Pro running! The fun is about to begin.
Phase 02: Post Processing 2. Don't be scared of the HDR image! This is not your final product and is unprocessed. To begin the processing, click on Tone Mapping. 3. This is where the magic happens. The Tone Compressor gives you “normal” HDR photos, which we will not cover in this tutorial. However, we will be covering the Details Enhancer, which will let you get the grungy bad-pacha look that is being used more often day-by-day. Drag Strength, Colour Saturation and Luminosity all the way up (100, 100, 10) as a starting point. Strength is how much the details are enforced, Colour Saturation is essentially how vivid the picture will be and luminosity is the radiance. The lower you will have Light Smoothing, the more unrealistic and surreal the image will look, so keep Light Smoothing pretty low. Also, keep micro-contrast all the way up (yes we want more! more I tell you! more!). Under tone settings, it is always good to keep some white points and some black point to enrich the contrast of the photo but varies according to personal taste. Gamma is the overall brightness of the scene so it is up to you to decide the level. One other setting you will need is keeping micro-smoothing (under the smoothing settings) at 0 as otherwise this will smooth out the grunginess. 4. When you save the file, be sure to save as 32-bit or 16-bit TIFF files as that will preserves the immense bit information in a HDR image for future editing in Photoshop or anywhere else. 5. Finally, play with the settings! There is definitely no fixed rule on how you want your photograph to be and ultimately it will be according to how your eyes appeases. So play around with it and see which setting you like. I am sure in a few tries you will end up with something fabulous. One final note I probably should mention is that the grungy HDR look works pretty weirdly with human photographs it creates an old version of you, albeit a quite cool one. Try it out if you want to and have fun! Be awe-smacking awesomeness! Yeah. By Adnan M. S. Fakir Press Conference of “Kajol-er Dinratri” at Reporters' Unity THURSDAY, the 20th of May saw media assembling in the VIP Hall of Dhaka Reporters' Unity to attend the first Press Conference of 2010's National Grant winning children's film, “Kajol-er Dinratri”. Personalities addressing the conference were Sajal Khaled (Director and Producer of the film), Md. Zafar Iqbal (Story). Lucky Akhand (Lyrics), Shujon Mahmud (Dialogues), and Rokeya Prachi (Actress). “Kajol-er Dinratri", penned by noted writer Md. Zafar Iqbal, is the story of Kajol, a teenager who comes face to face with real-life issues. He has a turbulent family life, and given his situation, has a much reduced self-esteem and courage. He realises these problems through a play on Freedom Fighters, and understands the true values of friendship and teamwork when he comes face-to-face with challenges. Overall, the story aims to show how no problem is worth giving up and how important it is to never lose confidence and trust in friends. Sajal Khaled in his address mentions that “Kajal-er Dinratri” aims to be more than just a film. This is a children's film, and hence will be incomplete without an active part from youngsters. By calling at 0172-7268-732, children aged 12-14 years, will be able to place themselves for auditions. Also, besides acting, by calling at 0171-7031-957, interested youngsters will be able to get behind-the-scenes of the film and see professionals at work behind the camera, editing room and even direction. A blog will be maintained and updated regularly with photos and videos for people to keep track of the film's progress. When asked details regarding the film's budget, Khaled says it will be a tough part of this film. While the budget is estimated at a little above Tk. 60 lacs, the government-provided Grant only provides Tk. 19.2 lacs. To add to all of this, the Film Development Complex (FDC) does not extend much help in this regard and their equipment fails to comply to the requirements of a film made in the latest digital format, instead of the old, albeit conventional, 35mm. However, this film is projected to be successful, what with its initial public response. Md. Zafar Iqbal, too shares Khaled's optimistic views. He mentions that he never thought that his story would see the big screen's light, and feels that children would enjoy this film. It is also clear that he will be directly involved with Khaled during direction of the film; and will help in preparations to have the film done and released by the end of this year or sooner. The event was also attended by Salma Mahbub, Head of Bangladesh Systems Change Advocacy Network (B-SCAN), a NGO working for the awareness of the plight of handicaps in Banglasdesh. She was invited by Sajal Khaled, who through his film will try to convey B-SCAN's message out to the masses. Later Shujon Mahmud, Rokeya Prachi and Lucky Akhand shared similiar thoughts on the film, saying that it indeed is a privilege to work with Md. Zafar Iqbal and their hopes for the film to be a lasting success. By Wahid T Khan Gals' pals and boys' toys
By Zabir Hasan |
|
| home
| Issues | The Daily Star Home © 2010 The Daily Star | |